
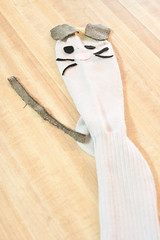
Supplies: 2 brown socks (one dark brown and the other light brown), black and pink felt or fabric, and washable fabric glue
Process: Pre-cut the shapes for the mouse's face and tail. Have the child use a Q-tip to dip into the fabric glue and put glue on the pieces. Then, have the child carefully place the pieces on the sock. Place the tail on the heal of the sock. Dry for several hours before handling.
Teach Well: Create the puppet after reading the book, If You Give a Mouse a Cookie. Have the child use their mouse to act out the story and to share with.
Showing posts with label art. Show all posts
Showing posts with label art. Show all posts
Wednesday, September 22, 2010
Tuesday, June 29, 2010
Guest Illustrator - Joel Stewart

Last week we featured Michael Rosen for the book Red Ted and the Lost Things and this week we have the pleasure to introduce the illustrator, Joel Stewart. His illustrations are beautifully whimsical.

When did you begin drawing?
I drew from childhood, though in a calm sort of way. I didn't go in for dragons firing lasers and rockets etc, which I think a lot of little boys do. My father still has some insects and wildlife drawings that I'd copied when very little. The thing is, I didn't give up. I don't really remember drawing wildly much before I was ten or eleven, but a lot of people in my family drew, and my grandfather made a living from it all his life, so I never had the all too common idea that it was just a childish thing to do.
What inspires you everyday?
Wow, big question. I think, like everyone, some days nothing does! But in terms of drawing there's just something about the activity that expresses things, and allows me to look at things, in a way that makes me happy. But so many things are inspiring, from all kinds of art and music that I tend to live in a permanent state of distraction. In some ways the times when you aren't inspired, and just get on with finishing what you started when you were, are just as useful.
What gave you the idea for the artistic style for "Red Ted and the Lost Things"?
Mostly my own sketches and paintings. I'd found that this particular shade of indian red had the interesting effect of giving a kind of warm, slightly nostalgic feeling like sepia, but the nostalgia (and that isn't the right word) wasn't specific to a time period, so it could feel contemporary at the same time. Then I also realized that doing backgrounds in a muted range of colours like that allowed me to put in loads of detail, which you need in a lost property office, or to give the feel of a real city, but keep focus on the central characters, who are more richly coloured. In a way I wish I hadn't let the texture of the backgrounds get so rough, because I think it distracts a little, but otherwise I think those ideas came together quite well.
What was the last thing you lost?
Actually, it was my favourite pencil, which I bought in Florence. I managed to replace it with one the same, but then I decided that I ought not to have a favourite pencil anymore because it's too annoying when you lose it.
Have you found it?
Nope. I think it's buried somewhere in a very messy and dusty music recording studio in North London.
Did you have a favorite Teddy Bear as a child? Did it have a name?
Badgie. He's a Badger Glove puppet, but I treated him like a Teddy Bear, and I still have him.
What advice do you have for parents who want to encourage drawing?
The most important thing probably is not to DIScourage it. Otherwise exposure is the best thing. Just to be around as many different kinds as possible, preferably without discrimination. I loved awful cartoons and comics as a child, as well as things that are still important to me now (including cartoons and comics of a slightly higher caliber), and they all fed my desire to continue. My parents were brilliant at not telling one thing was better than another. I imagine I might not be so good at being unbiased.
What can you tell children who have a passion for art?
That drawing (all sorts) is important. They'll already know it. But it can't harm to say it a few times
Teach Well: Do not discourage a child who has a desire or gift to draw. In fact, feed the desire to continue.
Tuesday, June 8, 2010
Guest Author - Leigh Hodgkinson
This week's guest author is Leigh Hodgkinson, who is also an illustrator and animator. Boris and the Wrong Shadow, is about a cat named Boris who wakes up from his nap having Vernon's shadow! Boris finds out what it is like having a shadow of a small mouse instead of his own. Not only is the story delightful, humorous, but the illustrations ROCK! Here's what Leigh had to say...

When did you begin writing and drawing?
I have always drawn and made stuff… as long as I can remember. A drawing or a painting or a collage or whatever, was never just that, there would always be a story to go with it… even if it was only in my head!
Can you explain a little bit of the process it takes to create your images? (Do you tend to use mixed media most of the time? Why do you use the media that you do?)
I love using an assortment of bits and bobs…. Scanning in textures (from potatoes to sequins to a nice piece of lace), using photographs, doing nice scribbly drawings and using paint and glue. What ever I feel like at the time! Then I never get bored or precious about what I create and I think (hope!) this makes the artwork feel fresh and fun. Then, once I have everything in the computer I can play with colour, scale, composition, and smarten it all up untill I get the image exactly as I want it. This way of working gives me a freedom that perhaps “traditional” artwork wouldn’t give me. I always feel little scared of a very clean and white piece of paper… I feel like I might make a mistake and muck it up. So I always like to scibble or paint or stick something on it just so stop the paper being quite so new to stop me worrying, then I can get on and enjoy being creative!
When did you begin making your images into movies and can you briefly tell the process of creating them?
I first studied animation at art school. This is when I got a taste for the magic of making things move… it got me hooked! After that, I went on to study animation direction at film school before then going on to work in the animation industry.
I make my animation in much the same way as my artwork for books and animate them in a styalised cut-out way in the computer. (where all the elements on screen are cut up into pieces so have the potential to be animated) I like working in a kind of 2.5d way! The animation is flat (2d) yet placed in a 3d environment. This way I can play around with lights, shadows and camera moves to add atmosphere and drama.
Where did you come up with the idea of “Boris and the Wrong Shadow?”
I have always liked shadows, whenever I am on holiday I always take photos of peoples shadows. I like the shapes they make, how they stretch and squish around things. Also, in “Peter Pan” I loved the bit when Wendy sews Peters shadow back on him… that idea that a shadow was part of you, but could be something detachable I found really interesting.
For me, the story isn’t just about shadows, it is about feeling happy and confident and happy with who you are. Venon tries to be something he is not, and that never works out well in the end. So Boris teaches him that being a small mouse is actually fine. I used the shadows as a way of visually showing that idea.
I also wanted to do a story where a cat and a mouse were friends. Boris is such a happy-go-lucky kind of a cat that he doesn’t care if you are a mouse or an elephant. If you are nice and interesting and fun to be with… that is all that matters.
If you could trade shadows with anyone or anything, what would it be?
Probably a giraffe…. I love their necks and would be an amazing shadow to have! I am not sure a giraffe would be so impressed with my shadow though!
When I had long hair I used to like putting it up in little scrunched up bunches that always reminded me of the funny nodules giraffes have on their heads. When I wore my hair like this it always made me smile when I caught sight of my shadow.
Do you have any pets?
No I don’t…. but I do have a little baby which nearly the same!
I really wanted a cat, which is why I wrote the origional Boris story (Boris and the snoozebox) about a cat who didn’t have a home and was sent around the world in a parcel. I would love it if a cat who didn’t have a home came to stay with me.
When I was a child we had siamese cats… and for a while, stick insects and silk worms!
What are your hobbies? (Do you love a home makeover like Vernon?)
I like swimming, listening to old records in the shed, making new things out of old things, sitting in cafes with friends, having baths and sleeping!
What do you like to do with your friends? (Tea please?)
I love having tea parties and picnics. This gives me a perfect excuse to make cakes and biscuits. A few years ago I had a “Cake-off” cake baking competition. It was fun, but there were about 20 different ones to try- everyone ate too much cake and felt a little bit sick! My husbands lemon drizzle cake won the first prize (and he hasn’t stopped showing off since!)
What advice can you give to children who love to draw and create?
Just enjoy the process of drawing and being creative. Don’t worry about whether it will be any good, don’t worry that it has to be the best thing you have ever done. Even if you make a mistake or think it is rubbish, you will learn from it. Some of the best things I have made have come out of doing something I didn’t mean to do. For me, the experimenting and the playfulness of creativity is what I find most enjoyable. So the most important thing is to have fun with it!
Also, be confident in your own ideas and ways of being creative. There is no right or wrong. That is what is so exciting about art. There is no one else like you in the world, so your way of seeing things and drawing things is unique. It is good to be inspired by others, but try not to copy. Anyone can copy, but not anyone can do what you do.
What advice can you give teachers about going that extra step to create movies of their classroom’s illustrated work?
Keep it simple. Animation is very involved and time consuming… so quite a lot of patience is needed. Perhaps start off with good old fashioned techniques that show the potential of animation to get pupils inspired….. zoetropes, flip books, then perhaps some simple under the camera cutout characters. Digital technology is making it easier for people to make their own movies which is fantastic. But it is important to be realistic about what you can achieve in the time so that pupils don’t get dissappointed. After all, one second of animation is 24 frames… which is 24 different images!
You can check out Leigh's other books and some of her animated videos at her blog, Wonky Button.
Teach Well: Have your child choose different items around the house, scan them, and create illustrations with them.
Friday, April 9, 2010
Worm Painting
This craft is loads of fun when pairing it with the study of worms or reading a worm book! Plus the look you get when the child touches it for the first time is priceless!
Supplies: brown paint, brown paper, and faux worms (found in worm bait) or rubber worms (found in party supply stores)


Process: Place the faux worm in the paint and let it wiggle around in the dirt (paint and paper).
Teach Well: Preschoolers need sensory experiences. Why not bring unique items into the classroom to help them explore? Those will be the ones they remember most!
Feathered Chick
Supplies: Construction paper, yellow feathers, buttons, and glue


Process: Draw the chicken shape on to construction paper and cut out. Have the children use glue to attach all the pieces to their bird.
Teach Well: Make a master and copy your chicken to the paper using a copy machine. If your children are old enough, let them cut the chicken out themselves to develop their small motor skills.
Saturday, March 13, 2010
Frog Painting
Supplies: Toy frogs, green paint, and copy of frog clipart


Process: Find frog clipart and make a copy on construction paper. Use the frogs to paint onto the paper.
Teach Well: Can't find frog clipart? Check your computer for variety.
Saturday, January 9, 2010
Driving in the Snow Sensory
This sensory is perfect for little boys! It keeps them busy for quite some time!
Supplies: white playdough and cars


Process: Use the white playdough as your "snow." Have the children drive along in the snow as they like!
Teach Well: White playdough maybe hard to make at home. During this time of year you may find white playdough in the seasonal department and during Valentines Day. I use inexpensive cars from the dollar store and keep them only for art projects. These are not save to play with since the wheels come off easy and are a choking hazard to young children. So, they are only used to paint with or in playdough.
Tuesday, November 24, 2009
Easy Christmas Cards
Christmas cards can be easy for children if you prepare the project to only a few simple steps! To get some ideas, go to card sites like this one or this one. I learned this design from Jeanean at Craft Warehouse. She does a card make and take every Sunday afternoon. It is a great way to learn how to do the project before you do it with your kids!


Teach Well: Try scrapbooking paper instead of construction paper for your Christmas crafts. It is acid free and will last longer for the parent who saves their child's art.
Pumpkin Pie Playdough
Supplies: pumpkin colored playdough, recycled pie tins, rolling pin

Process: Have the children make pumpkin pies with their dough. If you have a play kitchen have the children put their pies in the "oven".
Teach Well: If you have any pumpkin cookie cutters place them on the table for even more make believe!
Eat Chicken Thanksgiving Tees
These t-shirts make great shirts for a Thanksgiving program or party.
Supplies: White t-shirt, cardboard, and fabric paint


Process: Have the children bring the shirts in a few days earlier than the project. Place a piece of cardboard inside the t-shirt. Write the words "eat chicken" on the back of the shirt. Dry for at least 24 hours. On the day of the project, paint the child's hand quickly with a thick layer of paint (brown for the body and colors for the feathers). I let the children pick what colors they would like for the feathers. Press the hand flat on the tee. Add eye, beak, and waddle. Later add the words to the front of the tee. Let dry.
Teach Well: Do you have any wooden puzzles that need throwing away? Keep the wood board they sit in. They make great boards for the inside of the t-shirts. Reduce, reuse, and recycle!
Turkey Hats
Supplies: construction paper, black pen, stapler, and glue


Process: Cut out the shapes ahead of time. Make a headband by connecting two brown pieces of paper (about one or two inches wide). Have the children glue on the face pieces and staple the face to the front of the headband. Make the legs by folding the paper accordion style. Staple them to the headband. Staple the feathers to the back of the headband. This headband makes a great headpiece for a Thanksgiving program!
Teach Well: A great tip I learned was making sure the smooth side of the staple is on the inside of the headband so that it doesn't irritate the children.
Pumpkin Pies
Supplies: orange, brown, and white paper, pumpkin spice, glue, tape, and a shallow container


Process: Cut out pie and whipcream shape from paper. Create a crust from brown paper and tape to the back of the pie. In a container have the child squeeze glue on the paper. Shake pumpkin spice on the pie. Glue the whipcream cutout on top.
Teach Well: If the child is having a hard time shaking enough spice on the paper, pour some into the bucket and shake the bucket around to cover the glue.
Sunday, October 18, 2009
Masked Raccoons
I have been doing this craft for eight years. The idea was originally in Mailbox Magazine and I was glad to see this month's magazine have an updated version of this. Although, I stuck with my original design this year, I added the painted corn to the raccoon's hands. If you are doing a bulletin board, these little guys look so cute in a 3-D corn field. I will have to dig in my photos and see if I can find copies of the bulletin boards to share.
Supplies: glue, Q-tips, brown lunch sack, black marker, a white crayon for each child, and black paper
Process: Pre-cut the small pieces before craft time. On a different day, trace the children's hands onto black paper. Cut them out and have them ready to go on the day of the project. Read the story Raccoons and Ripe Corn. Then, remind them that raccoons have hands, eyes, ears, and a nose just like us. Together have the children find the mask shape and use a white crayon to draw the eyes. Remind them that they can draw a circle to make an eye. Put glue on the back and place on bag. Then have them find the oval nose to glue on next. Then remind them that the ears go on top of the raccoons head and to glue the triangle ears on. Then have them draw a mouth with a black marker. Also have them draw lines on the body. Glue the hands next.


Teach Well: It might be tempting to help the children glue since this is still close to the beginning of the school year. Children are still developing their small motor skills and may have a difficult time with this project. Go slow. Allow enough time to do this project with your class. Do it as a group so that children will see how others are successful and that they can be too! But, keep your hands to yourself! Let the child learn and be free to create as they wish! What you will get are not cookie cutter raccoons but a collection of creative critters to display!
Wednesday, October 14, 2009
Fall Collage
I am always trying to reduce waste in the classroom. I feel guilty throwing a small scrap of paper away! Why waste when children can create beautiful collages using scraps around the classroom?
Supplies: scraps of fall colored paper, fall stickers, confetti, yarn, silk leaves, magazine cutouts of farms or fall colors, diecuts, paper, and glue.


Process: Place items at your art center. Let your children create how they wish! I love using black paper for them to glue onto. It makes the colors stand out and it displays well.
Teach Well: Have glue bottles out until they master squeezing the glue out. Then move to small containers of glue with q-tips. It will help develop their small motor skills and save glue.
Thursday, October 8, 2009
Crayon Cakes
This isn't an original idea. I got this reciepe from a friend who got it from a friend; you know the drill. But, it is so brilliant I wanted to share! I love using crayon cakes for rubbings and for other small motor skill activities. For the season, I create cakes only with red, orange, green, yellow, and brown. You will see how we use these later in the month.
Supplies: old crayons, muffin tins or metal candy molds (if you use plastic as in the photo reduce cooking time), and a crock pot


Process: Soak the crayons for about five to ten minutes until the wrappers get loose. Have the children help you tear the paper off. Break the crayons into small pieces and fill the molds until they are heaping.


Place the top of the candy mold on top and snap closed. If you need to add more crayons open and do so now and make sure the mold is filled.

Place your molds into the crock pot and place on high for an hour and a half. Let cool and pop crayons out.
Teach Well: Let your children be involved in the process of creating items to use for another project. It gives them ownership for the items in the classroom.
Tuesday, September 29, 2009
Science Journals
Before our first science experiment, I have the children decorate the front of their science journals. We will be using these to record our observations during science time.

Supplies: Composition book, hot glue gun, paper glue, buttons, ribbons, markers, paper, and any other recycled materials
Process: Have the children pick out their paper and guide them to tear it down so that it will fit the cover of the composition book. Let the children glue it to the front cover. Glue another piece of paper to the top of that. Have the children place the items they want onto the cover of the book. Take the hot glue gun to the book and hot glue it into place. Using hot glue will make sure that the items won't fall off later.
Teach Well: Try not to move the items to where you may want to put them. Remember to let the child express themselves how they wish in art.
Wednesday, September 9, 2009
Welcome In the School Year Celebration!
Today begins the week long celebration leading up to Teach Often's Beginning of the School Year Kick-Off! Join me all week for ideas for the month of September, great teaching product, and prizes. Who doesn't like prizes? ;) You have a chance to comment on each post for each prized listed. All the comments for each post will close September 15th, at midnight Pacific Standard Time.
Next week opens the door to new ideas and possibilities in the classroom. There will be great ideas to bookmark or write directly into your lesson plans for the next day! Aren't you excited? I know I am!
I teach thematically, and September's theme is The Zoo. We learn about our Zoo Phonics friends, letter recognition, colors, school safety, and learn how to use our classroom.
A modern way to displaying the alphabet is by using one of these posters, from Westwillow Designs, in your classroom or at home.
 Sonya, once a teacher herself is now teaching her two children at home as a stay-at-home-mom. She designs beautiful pieces of art as her creative outlet. You can find more of her designs at her Etsy shop, Westwillow Designs.
You can add this poster to your classroom or child's decor by leaving a comment in this thread.
Next week opens the door to new ideas and possibilities in the classroom. There will be great ideas to bookmark or write directly into your lesson plans for the next day! Aren't you excited? I know I am!
I teach thematically, and September's theme is The Zoo. We learn about our Zoo Phonics friends, letter recognition, colors, school safety, and learn how to use our classroom.
A modern way to displaying the alphabet is by using one of these posters, from Westwillow Designs, in your classroom or at home.
 Sonya, once a teacher herself is now teaching her two children at home as a stay-at-home-mom. She designs beautiful pieces of art as her creative outlet. You can find more of her designs at her Etsy shop, Westwillow Designs.
 You can add this poster to your classroom or child's decor by leaving a comment in this thread.
Friday, August 21, 2009
Schedules and Creative Spaces
The best way to begin preparing yourself for teaching next year is with your schedule. When are you going to be teaching? Is it in the morning or does your child do better in the afternoon?
Then, decide what you are going to be teaching. My scope and sequence helps break down what I teach, when I teach it.
To give you an example, I copied my own schedule below:
Morning Preschool Schedule
8:30-8:45 Opening/Free Center Time
8:45-8:50 Clean Up
8:50-8:55 Pledge of Allegiance
8:55-9:15 Circle Time/Calendar
· Wednesday Discussion
· Thursday Math Concepts
· Friday Science Enrichment
9:15-9:30 Bible/Verses
9:30-9:50 Jamboree Time (Gross Motor Play)
· Aerobic Wednesdays
9:50-10:00 Drinks/Bathroom Breaks
10:00-10:20 Activity Time
· Wednesday Letter Readiness/Zoo Phonics
· Thursday Spanish
· Friday Computer
10:20-10:45 Snack
10:45-11:00 Story Time
11:00-11:20 Craft
11:20-11:30 Clean up/Song Time/Pray/Line up/Dismissal
If you teach from home you can easily create these learning spaces. Later in the school year, I will show you some of mine to get you even more inspired! Make sure to visit Megan's blog through out the year to get even more ideas!
Teach Well: Create creative spaces in your home or classroom. Don't worry... it's ok to be inspired by another teacher like Megan!
Then, decide what you are going to be teaching. My scope and sequence helps break down what I teach, when I teach it.
To give you an example, I copied my own schedule below:
Morning Preschool Schedule
8:30-8:45 Opening/Free Center Time
8:45-8:50 Clean Up
8:50-8:55 Pledge of Allegiance
8:55-9:15 Circle Time/Calendar
· Wednesday Discussion
· Thursday Math Concepts
· Friday Science Enrichment
9:15-9:30 Bible/Verses
9:30-9:50 Jamboree Time (Gross Motor Play)
· Aerobic Wednesdays
9:50-10:00 Drinks/Bathroom Breaks
10:00-10:20 Activity Time
· Wednesday Letter Readiness/Zoo Phonics
· Thursday Spanish
· Friday Computer
10:20-10:45 Snack
10:45-11:00 Story Time
11:00-11:20 Craft
11:20-11:30 Clean up/Song Time/Pray/Line up/Dismissal
The next step to preparing for the school year is by making creative spaces for learning. Whether you are going to be teaching from home or in the classroom, creative spaces help children experience learning in a unique way. To see a great example of that take a visit to Megan Powers' classroom, Scholastic's 2009-2010 Kindergarten Teacher Advisor.
Below is a video of her classroom. Check out her spaces!
If you teach from home you can easily create these learning spaces. Later in the school year, I will show you some of mine to get you even more inspired! Make sure to visit Megan's blog through out the year to get even more ideas!
Teach Well: Create creative spaces in your home or classroom. Don't worry... it's ok to be inspired by another teacher like Megan!
Monday, July 13, 2009
Flubber Fun
I love unique sensory experiences! Small hands need to explore and keep busy. This recipe is not for shaping but for exploratory purposes only. Our local dollar store and Target carry this flubber pictured below but you can make your own easily at home.
 Supplies: 2 cups white glue, 1 1/2 cup warm water, food coloring or non-toxic liquid watercolor; 4 tsp. Borax, and 1 1/3 cups warm water
Process: Mix glue, 1 1/2 c. warm water, and food coloring together. Mix Borax and 1 1/3 c. warm water together. Add Borax mixture to the glue mixture and stir with your hands as quickly as possible to get the borax solution and the glue solution to bind. (Use latex gloves to protect your hands from the liquid watercolor). Mix until all the water has been Incorporated into the mixture.
Some things to remember when using Flubber. Flubber does not come out of carpeting if dry. It will stick to clothing and hair, but can be soaked to remove.
Teach Well: Use flubber in a sensory table. With older children use straws to blow bubbles in the flubber. Use scissors to practice cutting skills over a tray.
Tuesday, May 26, 2009
Map Mud
Even though the school year might be coming to an end, learning never does. My curruculum ends at the month of May but I use the summer for a great time of sensory, fun, and games. The weather makes it easy to do those messy projects outside. When we did this sensory today, we used a plastic outdoor table and washed the table off with the hose when we were done. Run out of ideas to keep the kids busy? Stay close to this blog this summer and be inspired to teach your kids while having a great time doing it!
Supplies: 3 parts flour, 3 parts salt, 2 parts water, and food coloring if desired
Process: Mix salt and flour in a bowl. Add enough water to make a paste that is thick like frosting. Add food coloring or wait and paint when dry.
This recipe comes from Magic Mixtures Recipes for Fun and Learning by Heidi Stalder, Lane Community College
Teach Well: Some ways to use Map Mud - Spread the mixture on heavy cardboard, a sheet of plastic board, or wood. Shape to land features such as hills, lakes, and valleys. Use it as a sensory mixture and have children spread it like fingerpaint on a hard or washable surface. Use it to build dioramas.
Subscribe to:
Posts (Atom)